Loom beaded bracelets are exquisite pieces of jewelry, crafted with intricate designs and vibrant colors. Learning how to finish a loom beaded bracelet properly is essential to ensure its longevity and aesthetic appeal.
In this guide, we will guide you through the process, from prepping your bracelet for finishing to recommending a nice loom kit to get you started. Let's get started and transform those beads into a masterpiece!

Preparing Your Bracelet for Finishing
Before diving into the finishing process, it's essential to prepare your bracelet adequately. Here are the steps to follow:
How to Finish a Loom Beaded Bracelet?
Now that your bracelet is prepped and ready, it's time to learn how to finish bead loom bracelet. Here are five effective methods to finish off a loom beaded bracelet:
1. Using a Slide Tube Clasp
Slide tube clasps provide a sleek, secure finish. This method works well for even and odd-numbered bead rows.
1. Weave the warp threads back through several bead rows at one end.
2. Insert the woven end into the slide tube.
3. Apply a small amount of jewelry glue inside the tube to secure.
4. Repeat on the other end.
2. Adding a Bead Loop and Button Clasp
This method gives a decorative and functional closure, ideal for custom designs.
1. Weave the remaining warp threads on one end to form a loop big enough to fit your button.
2. Secure the loop by weaving the threads back into the beads.
3. Sew a button onto the other end of the bracelet using some of the warp threads.
4. Trim any excess threads.
3. Implementing a Toggle Clasp
Toggle clasps add an elegant touch and are straightforward to use.
1. Secure the warp threads by weaving back into the beads and trim excess.
2. Attach one part of the toggle to one end using a jump ring.
3. Attach the other part of the toggle to the opposite end.
4. Ensure both parts are securely fastened.
4. Using Ribbon Ends
Ribbon ends offer a fast and straightforward finishing touch, ideal for bracelets with more delicate beadwork. They are also a great option when you prefer to finish a bead loom bracelet without a clip.
1. Trim the warp threads close to the beadwork.
2. Place a dab of glue on the end of the bracelet and press it into the ribbon end.
3. Use pliers to clamp the ribbon end down securely.
4. Attach a clasp and jump ring to the ribbon ends.
5. Creating a Beaded Edging
Beaded edging can extend your design and enhance the bracelet’s aesthetic.
1. Using a needle and thread, add small beads along the edges by sewing between the existing rows.
2. Weave the thread through adjacent beads to secure each new bead.
3. Continue until the entire edge is covered.
4. Knot the thread securely and weave in the ends.
Bonus Tips
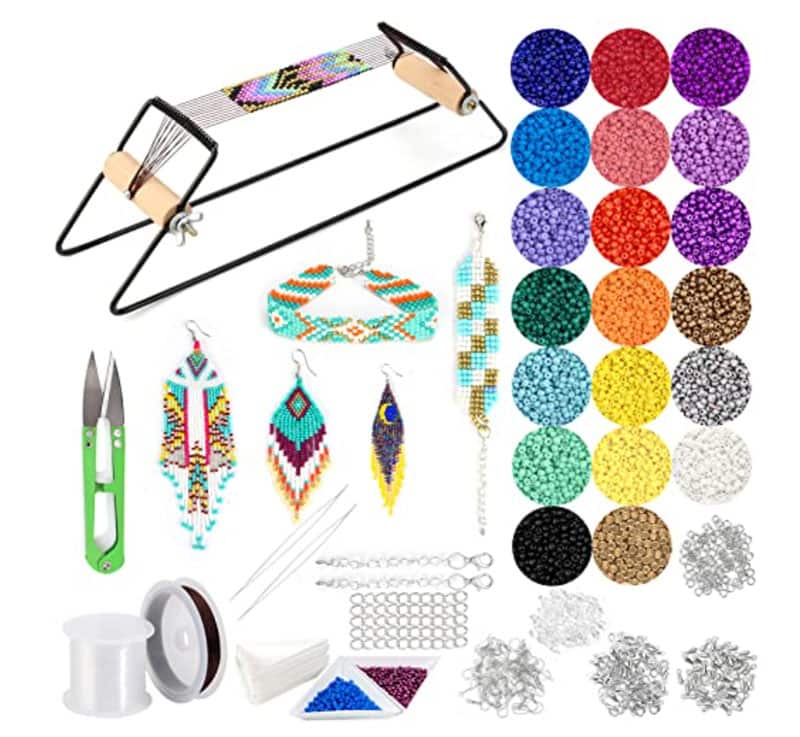
If you want to begin to craft a bead bracelet, you can purchase the PP OPOUNT Adjustable Bead Loom Kit as your starter. This kit offers everything you need to kickstart your jewelry-making journey. It includes a wooden bead loom, bead trays, needles, seed beads, crystal thread, crimp ends with chains, and detailed instructions, all neatly packaged in a gift box.
The adjustable loom allows for versatile designs, with a working area that can be tailored to your needs. Easy to assemble and suitable for beginners, this quality kit promises hours of creative fun, making it an ideal gift for craft enthusiasts.
Conclusion
Knowing how to finish a bracelet on a bead loom is crucial for ensuring its durability and aesthetic appeal. By following the steps outlined in this guide, from preparing your bracelet for finishing to adding decorative edges, you can create stunning and long-lasting jewelry pieces.
Whether you're securing knots, attaching clasps, or adding decorative touches, attention to detail and careful craftsmanship are key. With the right techniques and tools, such as the PP OPOUNT Adjustable Bead Loom Kit, you can unleash your creativity and enjoy the art of bead weaving while crafting beautiful bracelets that are sure to impress.