In a world filled with constant challenges and choices, finding a way to stay grounded and connected to one's faith is invaluable. One way to carry a constant reminder of your commitment to Christian principles is by crafting your very own WWJD (What Would Jesus Do) bracelet.
In this comprehensive guide, we'll explore the significance of WWJD bracelets, delve into the materials you'll need, and provide you with step-by-step instructions on how to make a WWJD bracelet. Without any further ado, let’s dive in!

The Significance of WWJD Bracelets
WWJD bracelets, standing for "What Would Jesus Do," have become a significant symbol in Christian communities, promoting a lifestyle aligned with the teachings of Jesus Christ. Originating in the late 19th century as a moral guide, these bracelets are made from a variety of materials including leather, metal, and silicone. The engraved acronym 'WWJD' serves not only as fashion items but also as spiritual reminders.
The impact of WWJD bracelets is profound. They remind believers to consider Jesus’s example in their decisions, promoting a thoughtful and ethical approach to life's challenges. This simple accessory has gained international popularity, emphasizing the importance of living in a way that reflects Christian principles, thus reinforcing community and personal faith.
Choosing Your Materials: What You Need to Get Started
Crafting your own WWJD bracelet is a fulfilling endeavor that requires minimal materials. Here's a list of what you'll need to get started on how to make WWJD bracelets:
Step-by-Step Instructions: Creating Your Own WWJD Bracelet
Now that you have gathered your materials, let us start on how to make your own WWJD bracelet in these easy steps:
Step 1: Measure and Cut the Cord
Start by measuring the cord around your wrist, leaving a little extra for tying knots. Cut the cord to the desired length using your scissors.
Step 2: Add Beads
Thread the beads onto the cord in the order you prefer. Consider using different colors to represent various aspects of your faith journey.
Step 3: Create a Focal Point
If you have a bead with the letters "WWJD," use it as a focal point. Position it at the center of your bracelet to emphasize the bracelet's purpose.
Step 4: Tie Knots
Tie secure knots on either side of the beads to keep them in place. Make sure the knots are tight to prevent the beads from sliding around.
Step 5: Add Clasp
Attach the clasp to each end of the bracelet, ensuring a secure connection. This step will make it easier to put on and take off your bracelet.
Step 6: Trim Excess Cord
Trim any excess cord with your scissors, leaving a neat and polished finish to your bracelet.
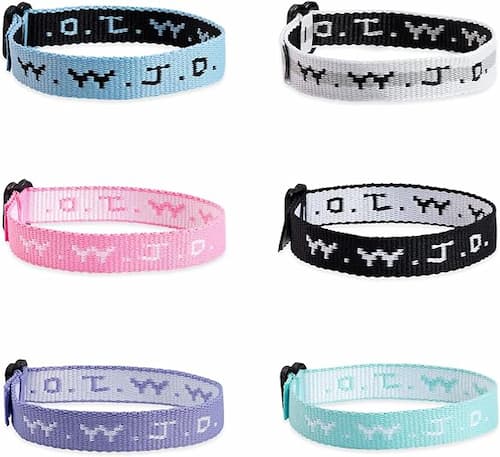
Having mastered the steps on how to make a WWJD friendship bracelet, you might also be interested in a ready-made alternative. The Elevated Faith WWJD Bracelet Pack is an excellent choice, offering six adjustable bracelets designed to facilitate meaningful conversations about faith. Ideal for those who prefer the convenience of pre-made accessories, these bracelets serve as a powerful tool for expressing and sharing your beliefs in a stylish and impactful way.
Conclusion
Crafting your own WWJD bracelet is a meaningful endeavor that merges creativity with faith. This guide has walked you through understanding their significance, selecting the right materials, and providing detailed instructions to create a bracelet that not only looks great but also holds deep spiritual value.
Whether you choose to make your bracelet from scratch or opt for pre-made options like the Elevated Faith WWJD Bracelet Pack, each bracelet you wear or share becomes a testament to faith and a tool for spreading positive messages. Embrace this craft as a way to express and share your beliefs, creating lasting impressions with every piece you make.