Looking to add some touch of flair to your jewelry collection or give a personalized gift to someone special? Knowing how to make clay earrings is a fun and creative way to do just that! With this guide, you'll learn everything you need to know about working with polymer clay, including the essential tools and materials and a step-by-step process for crafting beautiful handmade clay earrings. So, what are you waiting for? Let's get started!
Understanding Polymer Clay
Before we learn how to make clay earrings, we must first understand polymer clay. Polymer clay is a highly versatile, vinyl-based modeling material that remains soft until it is baked in a home oven. Unlike natural clay that requires high temperatures to fire, polymer clay can be easily worked with at home, making it ideal for crafters of all ages and skill levels. It can be blended to create custom colors, sculpted into various shapes, impressed with textures, and even after baking, it can be sanded, polished, or painted. This adaptability makes polymer clay a popular choice for creating detailed miniatures, decorative items like ring dishes, beads, and a wide range of jewelry, including the trendy and customizable polymer clay earrings.
Essential Tools and Materials
Ready to know how to make clay earrings for beginners? But first, you'll need some basic tools and materials that will help you shape, texture, and finish your creations. Here's a curated list to get you started:
Materials:
· Polymer clay in various colors
· Earring backs (posts, hooks, or hoops)
· Jump rings
· Flexible superglue
· Parchment paper or foil (for baking)
Tools:
· Acrylic rolling pin (avoid using ones intended for food)
· X-Acto knife, craft knife, or clay slicer
· Clay cutters or cookie cutters
· Toothpick or large needle (for detail work)
· Flat baking sheet (for oven curing)
· Jewelry pliers (for assembling)
NOTE: These tools and materials are your basic kit for starting out. The clay cutters, stamps, and textures can be as varied as your imagination, allowing for endless creativity in your designs.
Step-by-Step Guide for Making Clay Earrings
Below is a comprehensive guide to take you through each stage of how to make earrings using clay.
STEP 1: Prepping Your Workspace and Materials
Before you start, protect your working surface with parchment paper, a metal baking sheet, or glass. Clean your workspace and tools to prevent dust or lint from getting embedded in the clay. Ensure your hands are clean or use baby wipes for easy cleaning in between handling different colors.
STEP 2: Conditioning the Clay
Conditioning makes the clay soft, flexible, and easier to work with. Roll and knead your clay or pass it through a pasta machine multiple times. Properly conditioned clay will have no cracks or rough edges when rolled into coils.
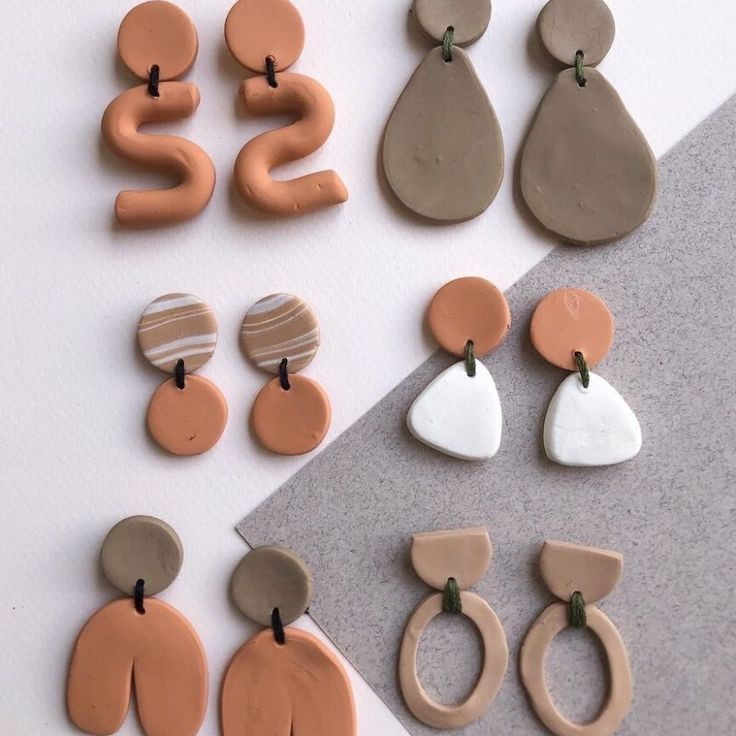
STEP 3: Color Blending and Design Creation
Blend colors by mixing clay to get custom shades. For designs, consider techniques like marbling, creating patterns (e.g., floral, geometric), or making textured surfaces using stamps or found objects. Use a rolling pin to flatten your blended or patterned clay into slabs of desired thickness, typically about 1/8 inch.
STEP 4: Cutting Shapes
Use clay cutters, cookie cutters, or a craft knife to cut shapes out of your slabs. For intricate designs or if you don't have cutters, trace shapes with a craft knife for cleaner edges. Remember to poke holes near the top edge of each shape for attaching jump rings later.
STEP 5: Baking
Preheat your oven according to the clay manufacturer's instructions (usually around 275°F (135°C) for brands like Souffle and Premo). Place your pieces on a parchment or foil-lined baking sheet, and bake for the ideal/recommended time, usually 15-30 minutes, depending on thickness. Covering with aluminum foil can prevent burning or browning.
After baking, let them cool completely before handling.
STEP 6: Finishing Touches
After your pieces have cooled, you can smooth any rough edges with sandpaper and/or a file. Wash them gently if needed. How to make clay earrings glossy? If you create pieces that require a glossy finish, apply a coat of clay varnish and allow it to dry as indicated.
STEP 7: Assembly
Use jewelry pliers to unlatch/open jump rings and attach your earring pieces to the earring backs. If your design includes layered pieces or needs extra reinforcement, use a tiny drop of superglue to secure them in place. And there you go, you now have your homemade polymer clay earrings supplies!
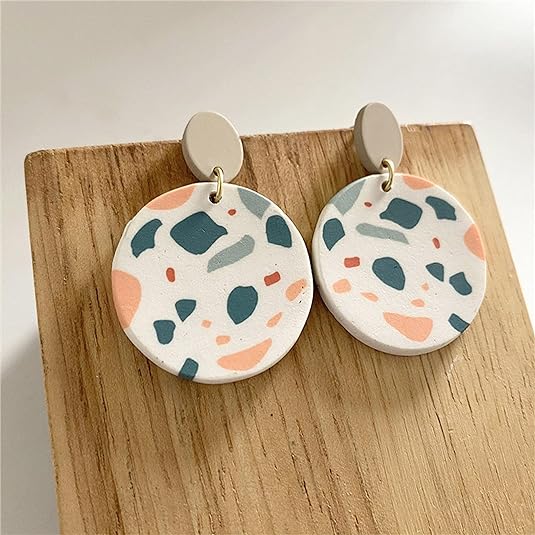
Best Handmade Polymer Clay Dangle Earrings
Want to buy a pair of clay dangle earrings instead of doing by yourself? Check out these exquisite Fuqimanman Handmade Polymer Clay Dangle Earrings. They're meticulously crafted using superior soft polymer clay, giving them a finer texture and handcrafted finesse. These earrings are designed to embody sophistication, dipped in minimalism and echoing a natural, chic vibe. They're amazingly lightweight, weighing just 0.28 oz, and provide all-day comfort without compromising on durability. You can easily pair them with any kind of outfit, making them perfect for every occasion, be it a casual outing or a special/grand celebration. If you're looking for a thoughtful and stylish gift for your loved ones, these earrings are a perfect choice. And, if for any reason you're not satisfied with your purchase, Fuqimanman promises to offer either a gleeful replacement or a full refund.
Conclusion
Indeed, learning how to make clay earrings is a delightful project that blends creativity with the joy of crafting. By following these simple steps and allowing yourself the freedom to play with different colors, textures, and shapes, you'll soon be able to create beautiful custom jewelry pieces. Remember, practice makes perfect, and every piece you craft will improve your skills and refine your technique. Happy crafting!