Friendship bracelets are classic symbols of friendship, with each strand of weaving conveying a different tale. Learning to read friendship bracelet patterns is the cornerstone of this craft, transforming simple strands of thread into intricate designs and symbols of connection. This guide will illuminate the basics of bracelet patterns, unravel the meanings behind knot symbols and types, and provide a step-by-step approach to how to read a friendship bracelet pattern. Let’s dive in!
Understanding the Basics of Bracelet Patterns
It's important to understand the fundamentals that give friendship bracelet designs their distinct charm before delving into the complex world of friendship bracelet patterns. Bracelet patterns are a harmonious fusion of colors, symbols, and knots that all add to the piece's overall design and significance.
Elements of Bracelet Patterns
1. Knots: Friendship bracelets primarily involve two types of knots – the forward knot and the backward knot. Mastering these fundamental knots is key to creating various patterns, from simple designs to more complex configurations.
2. Colors: The color palette you choose plays a crucial role in expressing emotions and meanings within a bracelet. Different colors hold symbolic significance, allowing you to convey messages and sentiments through your craft.
3. Symbols: Bracelet patterns often incorporate symbols that carry personal or cultural meanings. Understanding these symbols adds depth to your creations, turning them into unique expressions of connection and friendship.
Bracelet Types
- Simple Knot Bracelets: Ideal for beginners, these bracelets feature uncomplicated knot patterns, making them a perfect starting point for those new to the craft.
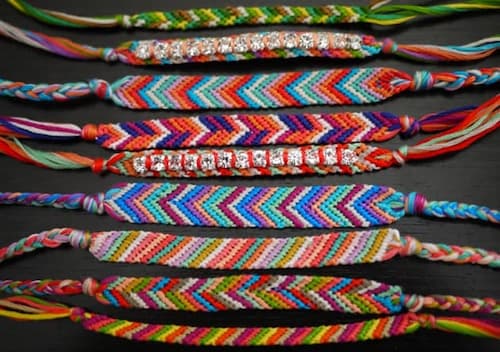
- Chevron Bracelets: Recognizable by their V-shaped patterns, chevron bracelets add a touch of sophistication. They require a bit more skill but result in stunning, eye-catching designs.
- Alpha Patterns: Create personalized bracelets by combining letters and numbers in alpha patterns. These patterns, resembling cross-stitch grids, convey messages through knots. Wondering how to read alpha friendship bracelet patterns? Each grid square represents a knot or a combination, enabling unique and meaningful designs.
Tools and Materials
- Embroidery Floss or Thread: Choose a variety of colors to add vibrancy and meaning to your creations.
- Clipboard or Safety Pin: Secure your bracelet in place while working to maintain tension and ensure a polished finish.
- Scissors: A sharp pair of scissors is essential for cutting thread and achieving clean, precise edges.
Decoding Knot Symbols and Types
When making a friendship bracelet, decoding knot symbols and types is essential. Each pattern comprises specific symbols representing different types of knots, which are the building blocks of every bracelet design. Understanding these symbols allows you to bring intricate patterns to life.
Knot Types
1. Forward Knot (Fwd):
- Technique: Create a knot by moving the left string over the center strings and then under the right string, pulling it through.
- Symbol: Represented by a forward arrow, this knot is fundamental for building most bracelet patterns.
2. Backward Knot (Bwd):
- Technique: Form a knot by moving the left string under the center strings and then over the right string, pulling it through.
- Symbol: Indicated by a backward arrow, this knot complements the forward knot and expands the range of patterns.
3. Double Forward Knot (DFK) and Double Backward Knot (DBK):
- Technique: Similar to their single counterparts but repeated for added thickness.
- Symbol: Represented by two arrows, these knots enhance the bracelet's texture and durability.
Common Symbols in Bracelet Patterns
1. Diamonds:
- Symbol: A series of knots forming a diamond shape.
- Meaning: Represents durability, strength, and the unbreakable bond between friends.
2. Hearts:
- Symbol: Knots arranged in the shape of a heart.
- Meaning: Signifies love, affection, and a deep connection between individuals.
3. Arrows:
- Symbol: Knots forming arrow shapes.
- Meaning: Represents direction, growth, and the journey of friendship.
4. Stars:
- Symbol: Knots arranged to create a star.
- Meaning: Symbolizes guidance, inspiration, and the shining presence of friendship.
Advanced Knot Techniques
1. Loop Knots:
- Technique: Create loops within the bracelet for added dimension.
- Meaning: Represents interconnectedness and the continuous nature of friendship.
2. Zigzag Knots:
- Technique: Form a zigzag pattern using alternating knots.
- Meaning: Signifies the dynamic and ever-changing nature of relationships.
Step-by-Step Guide to Reading Patterns
Reading friendship bracelet patterns step by step is like deciphering a secret code at first, but with a systematic approach, you can turn any complex design into a beautiful, handcrafted reality. Follow this friendship bracelet instructions:
1. Gather Materials and Pattern
Before starting, ensure you have all the necessary materials: embroidery floss or thread in desired colors, a clipboard or safety pin to secure your work, and a printed or digital copy of the bracelet pattern.
2. Understand the Pattern Key
Examine the pattern key to familiarize yourself with symbols and color codes. Symbols represent different knot types, while colors correspond to specific threads. Take note of any special instructions or repeated sections.
3. Start from the Bottom
Begin working on the pattern from the bottom, as most patterns are designed to be read from bottom to top. This ensures that your design unfolds correctly as you progress.
4. Follow Row-by-Row
Read each row of the pattern horizontally, following the symbols and color codes. Execute the corresponding knots with the designated thread colors, maintaining accuracy to replicate the intended design.
5. Use Highlighters or Markers
To avoid confusion, use highlighters or markers to color-code your pattern as you work through it. Mark completed rows to track your progress and prevent repeating sections.
6. Maintain Tension
Consistent tension is crucial for a neat and uniform bracelet. Keep your threads taut but not overly tight, ensuring that the knots align properly and the pattern emerges as intended.
7. Check Your Work Regularly
Periodically step back and examine your work against the pattern to catch any mistakes early on. Correcting errors promptly ensures the overall accuracy of your bracelet.
8. Repeat and Connect Rows
As you finish each row, move on to the next one, repeating the process until the entire pattern is complete. Ensure that the rows seamlessly connect to maintain the fluidity of the design.
9. Finalize with End Knots
Once you've completed the pattern, finalize your bracelet with end knots. Trim any excess thread and secure the knots tightly to prevent unraveling.
As you become adept at reading friendship bracelet patterns, you'll find that each piece you create is imbued with personal significance and artistry. For those looking to elevate their handcrafted gifts, consider the jewpark BFF Bracelets. These exquisite pieces, crafted from quality materials and featuring adjustable sizing for a perfect fit, encapsulate the essence of eternal friendship through their unique design. Ideal for commemorating special moments, these bracelets serve as a beautiful testament to the enduring bonds of friendship.
Conclusion
Mastering the art of how to read friendship bracelet patterns adds a personal touch to your creations, allowing you to weave stories and emotions into every strand. Whether you're a novice or an experienced crafter, this guide equips you with the knowledge to navigate the world of intricate patterns.